Saturday, 29 July 2017

Rocky Road Brownies


There Really Is Nothing Better Than Rocky Road Brownie. So, Let’s Do This!


Ingredients:

Brownie Base-
½ cup Butter
1 cup Dark Chocolate 
1 cup Caster Sugar
2 Eggs
3/4 cup Flour
1 tbsp. Cocoa Powder
1 tsp Vanilla Extract
Oil- For Grassing Tin

Rocky Road Topping-
1/4 Cup Chopped Almonds
1/4 Cup Chopped Walnuts 
1/2 Cup Dark Chocolate Chips
1 Cup Mini Marshmallows / Chopped Marshmallows

Tools-
Steel Mixing Bowl
Spatula
8x8 Inch Square Cake Tin / Brownie Tin
Measuring Cups
Measuring Spoons
Cake Needle
Whisk
Aluminium Foil or Parchment Paper
Wire Rack


Lets Get Baking!


1.Preheat Oven at 160c, Prepare 8 x 8 Brownie Pan by lining the sides 
and bottom with parchment paper or aluminium foil.

2.Lightly grease the foil or paper with oil.

3.Melt the chocolate and butter in a large stainless steel mixing bowl placed over a saucepan of simmering water. 

4.Remove from heat and whisk in the sugar.

5.Whisk in the eggs and vanilla.

6.Finally, stir in the flour & cocoa powder

7.Pour into the prepared pan and bake for about 25 minutes,
or until a cake needle inserted into the centre has a few moist crumbs clinging to it.

8.Pull out the brownie from the oven and lightly sprinkle the rocky road topping on it and put the brownie back in the oven.

9. Bake for another 5 minutes 
or just until the marshmallows start to melt!

10.Remove from oven and place on a wire rack to cool.

11.Once cool, remove the brownies from the pan by lifting with the ends of the foil and transfer to a cutting board. 

12.With a sharp knife, cut into 16 squares. 


READ MORE »

Saturday, 30 July 2016

Hong Kong Disneyland


There isn't  a better way to start off this posts than stating the fact that I love Disneyland!
 No matter how many times you go to Disneyland its always going to be a… magical experience.

My first ever Disneyland experience was years ago and I almost cried with happiness as soon as I entered.The feeling was exactly the same this time too.

After some must-have snaps at the main disneyland gate and near the train station I finally decided to put the camera away and enjoy and get to the serious stuff.... the rides.


I couldn't decide where to go first so I planned smartly and grabbed some fast track passes to all the rides I really wanted to go to and while I was waiting I enjoyed exploring the souvenir shops and cafes, and DAMN I wanted to buy everything. 


Tip- Get fast track passes to avoid standing in line for hours… YES HOURS!


Disneyland is the happiest place on earth even when its raining and gloomy, which also meant that the night parade which i'd been waiting for all day wouldn't happen but I did watch the evening parade and it was MAGICAL.


 I went on almost every ride at the park, taking every little detail in. I took tons of pictures and declared that I would happily live at Disneyland, humming "Its A Small World" Song.


I hopped and skipped through the park and eventually after tons of mini shopping sprees I made my way to the space mountain rollercoaster.. the ride i was made for!
After a bite to eat I crept into a cruise and sailed through the mysterious forest where Tarzan lived.


(Oops the quality become terrible when i converted the video into a gif...sorry)


The day ended with fireworks at the Sleeping Beauty Castle and you can’t fail to feel a little nostalgic as you see the castle lit up with characters and fireworks.
What I'm Wearing -

Skirt- Myntra Top- Hnm Sandels- Hnm Hat- Hnm 
Backpack- forever 21 Necklace-Celestial Kitten


READ MORE »

Friday, 22 July 2016

kylie Cosmetic Lip Kit


So I’m Gonna Review The Super Hyped Kylie Lip Kit That Everyone Has Been Talking About….

I'm not really good with liquid lipsticks and I've only used this one Nyx matt lipstick that I own  besides kylie lip kit. but now I have finally realised how amazing liquid lipstick are, they are easy to apply and are more pigmented than the normal classic stick lipsticks, oh and they last way longer too.And for that reason alone I am now obsessed with liquid lipsticks.

when I got to know that kylie was launching her own line of lipsticks and glosses , I was just like meh.. but after looking at all those gorgeous pictures and watching review videos on youtube…out of curiosity, I just NEEDED to try one myself! 

I couldn't get my hands on the lip kit when it was released online the first few times,
It felt like purchasing a concert ticket… am I'm never the one with great luck when it comes to things like this. But eventually I did manage to get myself one and honestly the price is not to bad either.


I got Exposed which is a Nudey Warm Brown Shade, it goes perfectly with a casual look, but is also kinda a night time shade.
and I love it mostly cause it doesn't make me look vampire-ish with my pale skin..


The liquid lip stick is super creamy and easy to apply, it doesn't dry too quick and smells like food flavouring...and thats not my fav, so not too fond of how it smells.

#1Tip-DO NOT smack your lips together while its wet cause you're gonna end up with flaky chunky bit on your lip ~.~

After applying it my lips became super dry and flaky...more than usual and you could see the deep lines and dryness, which was a bummer.

#2Tip-Exfoliate and moisturise you'r lips before applying the lipstick.


READ MORE »

Saturday, 9 July 2016

Sun Splash


 I didn't  like any color other than green until I saw this yellow dress..


I Was Just Scrolling Through Instragram Explore When I Saw Someone Wearing This Yellow Dress And I Couldn't Stop Myself From Clicking On The Website Link And Checking It Out.


Everything Is Perfect About This Dress From The Color To The Style. Its Super Comfy And Perfect For Windy Summer Days.
You Can Style It With Some Bohemian Jewellery To Make It Look A Bit More Stylish Or Just Wear Something Minimalistic...


Sunglasses- Forever 21

Sandles- HnM


Bag- Accessorize 


READ MORE »

Friday, 10 June 2016

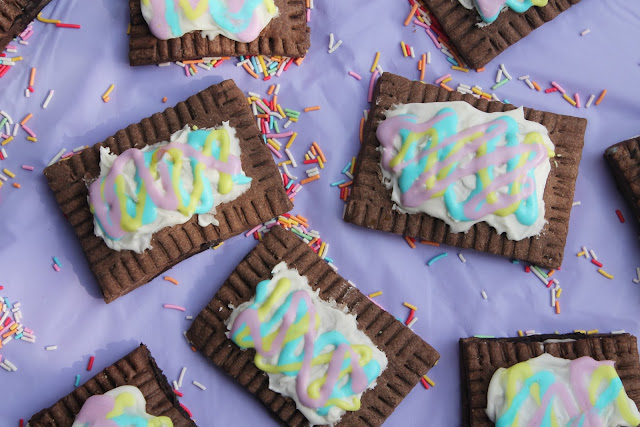
PASTEL BROWNIE POP TARTS


Are You In The Mood To Have a Chocolatey Brownie Filled Fun Breakfast ?
If Yaasss Then These Pastel Pop Tarts Are Perfect!

Ingredients:

Filling For Pop Tart-
1/4 Cup Unsweetened Cocoa Powder
1/2 Cup Brown Sugar
1/2 Cup Cream
1/2 Cup Chocolate Chips
5 Teaspoons Butter
1 Teaspoon Vanilla

Pop Tart Dough
3 1/2 Cups fFour
4 Tablespoons Cocoa Powder
200 Grams Cold Butter
1/2 Cup cold water 
2 Tablespoons Sugar

Royal Icing
2 Cups Powdered Sugar
1 Egg White
Few tablespoons Of Water (if you want to make the icing thinner) 
Food Color Of Your Choice 
Piping Bags 

Lets Get Baking!

1.For the filling 
-in a small Bowl, combine cocoa powder, brown sugar, cream, 
 chocolate chips,& butter. Microwave till the chocolate is melted.
 Mix till smooth. 
 add in vanilla essence & Let it cool completely.

2. Preheat oven to 200 degrees Celcius.

3. For the Dough
    -combine flour, cocoa powder, sugar,  in the bowl of a food processor. 
     mix till combined.
4. Cut cold butter into cubes. Add to food processor. 
    mix till the mixture becomes crumbly. 
    Add in the cold water and mix just till combined.

5. Transfer dough to a lightly floured surface. Roll to about 1/8 inch think.

6. Cut out an equal number of the same sized rectangles. 
    Place a tablespoon of filling onto half of the rectangles.
    Brush edges with a little water to help the dough stick!
    Place the other half of the rectangles on top of each filled rectangle. 
    Press the edges with a fork to seal. 
    Poke a few holes on top of each one to let air out.(or you will legit have POP tarts..)  

7. Place on a cookie tray lined with parchment paper. 
     Bake for 10 to 12 minutes. 
     Let cool before icing.

8. Whisk together the powdered sugar, egg white and 
    add 5-6 tablespoons (+ or- for desired constancy) of water in a stand mixer till smooth. 
    Transfer to a piping bag fitted with a small round tip or a disposable piping bag and snip the end off. 
    Pipe a rectangle of icing on each pop tart, and then drizzle coloured icing on top!
    To add more colors and fun just Sprinkle some Sugar confetti/sprinkles!


READ MORE »